Hello beautiful readers! I love a good DIY and I love decorating. I had the opportunity to do a fun room makeover for my boyfriend's daughter. I did this a couple years ago, but in the true spirit of procrastination. I'm just letting you all in on it now. My boyfriends daughter was turning 12 and she still had the cute little baby girl room from when she was little. She needed an update fit for a preteen, so I decided to revamp her room for her birthday. I had so much fun. Let me show you how I did this fun update on a small budget doing a bunch of DIY projects. The entire start to finish project took me about a week. Sorry about my minimal before pictures, but here is a picture of what the walls looked like before the makeover.
My first step was to take down the old wall border. I bought a spray to help take it down, and scored it with a serrated knife because I was trying to save money on the scoring tool..haha. It worked ok.
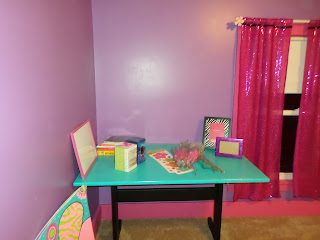
The next step was to paint the walls and trim. I decided on a fun bright color scheme that she would love. I went with a bold purple on the walls, pink trim and teal accents.
I was lucky to have my mom and grandmother contribute to the room too. My mom made some fun sequined curtains and sewed some fuzzy fun pillows. My grandmother knitted a blanket for the room.There were already some cute girly curtain rods in the room, I just repainted them to go with the new color scheme.This next picture showed what they looked like before and you'l see the after in the later pictures. So the next step was to hang the fun new curtains.
Next she needed a desk, so I took to the local town wide yard sale and found a small dining table that would work perfectly for just a dollar. I took it home and spray painted it teal and black to match the accent color.
I also did the same with her existing old dresser. I spray painted it in two colors and sprinkled it with glitter while it was still wet.I ran out of one can of spray paint as I was painting, so I just went with it and ended up with a kind of speckled graffiti look on top. I like the result.
I also revamped a couple other existing pieces in her room including a small chalkboard with hooks, and a small bookshelf.
The bookshelf was in primary colors with ABC cutouts on the sides. I painted it and covered the cutouts with home made pink animal print insets.I placed it on top of her desk for storage.
I repainted the chalkboard and personalized it with her name.
I also repurposed a small book shelf I already had, painted it pink and used it for some small items in her room.
I had a small lamp that I painted black. I covered the shade in funky duct tape, and added a pink feather edging. These were all things I had on hand.I used an existing chest against the wall as a bench seat or reading nook, and covered it with the hand made blanket from my grandmother. I added the fun pillows my mom made.
I bought 3 large foam boards at the dollar store to create some funky art for her walls. I painted 3 bright colorful designs on them. As they dried the paper separated from the foam board, but that was ok. I just tacked them to the wall.
I added some fun accents to the walls, including these 3d butterflies that I got on clearance for $6, and some cute colorful wall stickers from the dollar store.
I made this fun colorful little accent from a paper punch and some paint samples,some thread and a pipe cleaner.
Abover her desk I hung some of the fun crafty things we had made together, and a little magnetic white board I had.
I used most of her existing bedding. I just bought a new blanket for the bottom bunk. In a fun pattern.
I hung up a few existing things from her old room and set up the rest of her things.
I ended up taking a patio chair and spray painting it for her desk.
She loved it!! She was so excited!
This was such a fun project and I really had minimal costs. I used everything I could that was already there just by repurposing, and getting a little creative.
Total cost for everything I had to buy was under $100. How much she loved it was priceless.
I hope you enjoyed this DIY makeover. I hope to share more DIY projects with you in the future.
XOXO
Roberta


